 Wearing Them Where They Actually Work
If your orthodontist has asked you to wear Class III elastics, you’re at a key stage of bite correction. These small rubber bands do a big job – but only if placed in the right spots and worn consistently.
Sound simple? It is. And once you’ve done it a couple of times, it’ll be second nature.
You might want to practise in front of a mirror the first few times. That way, you can double-check placement and build confidence as you go.
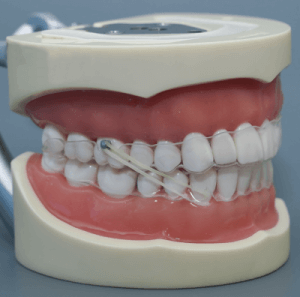
Correct Placement, Step by Step
Class III elastics go from the lower front to the upper back. Start with the hook on the lower corner – the one closest to the front, with a small tie around it. Hook your elastic there first. Then stretch it up to the second-to-last bracket on your top row of teeth. You’ll do the same on the other side.
It’s usually easiest to hook the bottom first, then stretch up to the top corner.
Be gentle when stretching – sharp movements can flick the elastic or make it harder to control. Slow and steady wins this race.
Wear Time Really Matters
These elastics need to be worn full-time, which means all day and night. Only remove them to eat or clean your teeth – and make sure you roll them onto your finger so you remember to pop them straight back in afterward.
If your jaw or teeth feel sore for the first few days, that’s normal. Panadol or Nurofen can help while your mouth adjusts.
Try not to skip days, even if you’re sore. Wearing them less often won’t give your mouth a break – it just slows progress.
The Sooner You Commit, the Sooner You’re Done
Skip a few hours here and there? That could mean weeks longer in treatment. So stick with it – you’ve got this.
If anything feels confusing or uncomfortable, we’re always just a message or call away. At Wavescape Orthodontics, we’re here to support you every step of the way!
CONTACT US